

How To Export Photos From Iphone To Macbook Air
Nowadays, you can take high-resolution pictures at a moment's notice using your smartphone.
The downside? Over time, those pictures can start taking up a lot of memory on your mobile device.
Luckily, if you're an iPhone user, Apple makes it incredibly easy to transfer photos from your phone to a different Apple device, like a Mac.
How to transfer pictures from an iPhone to a Mac with AirDrop
- Open the iPhone Control Center and enable Airdrop in Network Settings
- Open Finder on your Mac to enable AirDrop on your computer
- Locate the picture in your iPhone camera roll and click the share button
- Tap the icon with your Mac on it
- Accept the AirDrop on your computer and open the image in the Photos app
There are several different ways you can move pictures off your phone. If you'd like to skip ahead to see a particular method, use the links below:
Import photos with a USB cord
Import photos through iCloud Photo Stream
Import photos through AirDrop
In this article, we'll outline each method using simple step-by-step tutorials. Let's dive in.
3 ways to move photos from an iPhone to a Mac
If you're trying to free up storage on your iPhone or are simply looking for a better place to store your pictures, it's a good idea to transfer them to your Mac. Below, we've listed the three easiest ways to do this with easy-to-follow steps.
Transferring photos to a Mac with a USB cord
This import method echoes the old school days of carrying around a bulky digital camera everywhere and using a cord to transfer your pictures. Although it might seem outdated, using a USB cord is still an easy and convenient way to get the job done.
Step 1: Connect your iPhone to your Mac with a USB cord
Simply connect your iPhone to your Mac with a USB cord. Newer Macbook models (2015 or later) require a USB-C cord. If this is the case, you will need to purchase a USB-C cord or USB-C adapter.
Step 2: Select "Trust This Computer"
As a safety precaution, a window will pop up on your iPhone that asks you if you can Trust This Computer. Select Trust when prompted.
Step 3: Open "Photos" on your computer
The Photo app should open automatically after a few seconds. If it doesn't, select the Photos icon (![]() ) to open the application.
) to open the application.
Step 4: Select desired photos and click "Import"
Once Photos is open on your computer, it will automatically start pulling up pictures and videos from your camera roll. On this screen, you can select individual pictures you'd like to transfer to your computer. If you want to transfer all of them, click Import All New Items.
Once the import is complete, you can disconnect the USB cord.
Transferring photos to a Mac with iCloud Photos
If you prefer a wireless option, you can transfer photos to your Mac using iCloud, specifically through the iCloud Photos feature. When enabled, this feature syncs all of your pictures and video files from your iPhone to iCloud.
Before starting, make sure you have enough iCloud storage to proceed. If not, you may need to upgrade your storage plan through Apple.
Step 1: Enable iCloud photos on your iPhone
Go to Settings, then click on your name at the top of the screen. From there, select iCloud, followed by Photos and enable iCloud Photos.
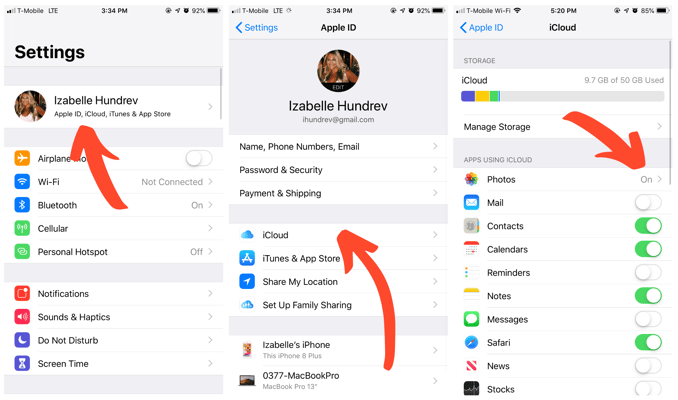
You'll do the same for your computer in the next step.
Step 2: Turn on iCloud Photos on your Mac
On our computer, open System Preferences (![]() ). Next, click on iCloud, then Options, and finally select iCloud Photo Library.
). Next, click on iCloud, then Options, and finally select iCloud Photo Library.
Once you've enabled iCloud Photos on both devices, all of your iPhone photos will automatically sync to your Mac. You can find them in the Photos app under the iCloud Photos tab.
Transferring photos to a Mac through AirDrop
AirDrop is another wireless option for transferring your photos to and from your Mac. The service works through Wi-Fi and bluetooth, so you'll need to make sure you're within range of the computer you're transferring the files to and have a strong Wi-Fi connection.
This method is quick and simple, but it takes a bit longer to transfer photos in bulk.
Airdrop only works on Mac models introduced in 2012 or later. Additionally, you'll need an iPhone 5 or newer.
Related: For more information on AirDrop and its capabilities, use our guide to learn how to use AirDrop for different types of file sharing.
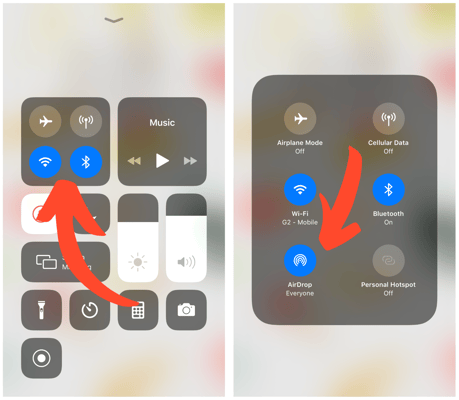
Step 1: Open the iPhone Control Center and select Network Settings
Grab your iPhone and swipe up on the main screen to open the Control Center . If you have an iPhone X or newer, you can access this screen by swiping down from the upper-right corner of the screen
Once the Control Center is open, firmly press down on the upper-left box that shows the airplane mode and Wi-Fi symbols. Once you're there, enable AirDrop by click on the AirDrop icon (![]() ).
).
Now that you have AirDrop enabled on your iPhone, the next step is to do the same for your Mac.
Step 2: Open Finder on your Mac to enable AirDrop
On your computer, open Finder and select Go, followed by AirDrop. This will open up the AirDrop settings on your Mac, where you can see what nearby devices are available. Your iPhone should pop up letting you know that it's within range.

Step 3: Select picture from iPhone and click the share button
Switch back to the iPhone and locate the picture you want to transfer. Open the picture and select the share button (![]() ). Give the screen a few seconds to load until you see your Mac pop up where it says Tap to share with AirDrop.
). Give the screen a few seconds to load until you see your Mac pop up where it says Tap to share with AirDrop.

Next, tap the name of your computer to initiate the drop.
Step 4: Accept the AirDrop image on your Mac
Once the signal reaches your computer, you will receive a notification prompting you to Accept or Decline the image. Click Accept, then Open in Photos.

Ta-da! Your picture is automatically saved in the Photos app.
Picture perfect
It's really as simple as that. Whether you're looking to free up space on your smartphone, or just want a safe place to store your personal photos, now you know how to do it using your Apple devices.
Retouching your photos on a big, high-resolution computer screen is a lot more convenient than using your phone. Discover the best photo editing software to take your pictures to the next level.

How To Export Photos From Iphone To Macbook Air
Source: https://learn.g2.com/how-to-transfer-photos-from-iphone-to-mac
Posted by: smithfescithavers.blogspot.com
0 Response to "How To Export Photos From Iphone To Macbook Air"
Post a Comment